记录了一次最终失败的Linux内核升级之旅。
起因是组内有一台老旧设备内有一款老旧的软件,由于年代久远(最后的更新大概是在2008年),在新的设备上编译安装有点麻烦,尝试了很长时间暂未成功。受Linux平台的Appimage格式软件的启发,想尝试用类似的方法直接打包软件环境移植到其它设备上使用。最近终于把系统虚拟化了,做了备份就可放心大胆的折腾了。由于系统老旧(RHEL 5.1,内核版本2.6.18)之前使用过的打包工具linuxdeploy不能直接使用,安装了FUSE后因为内核太低依然不能使用,于是开启尝试内核升级之旅。
操作流程
-
下载内核源码 网上有些资料介绍使用yum安装内核,或下载rpm文件安装,可是由于系统老旧可用的软件源没有发现所需的内核,故此选择源码编译安装的方法。源码为界从这里下载👉http://www.kernel.org/pub/linux/kernel/ ,选择所需的版本下载解压即可。
-
内核配置 首先使用
make menuconfig命令进入配置菜单,配置内核需要启用的特性(如无特殊需求默认即可)。界面上方有操作说明,Y是选择,N取消选择等,记得配置好后保存一下。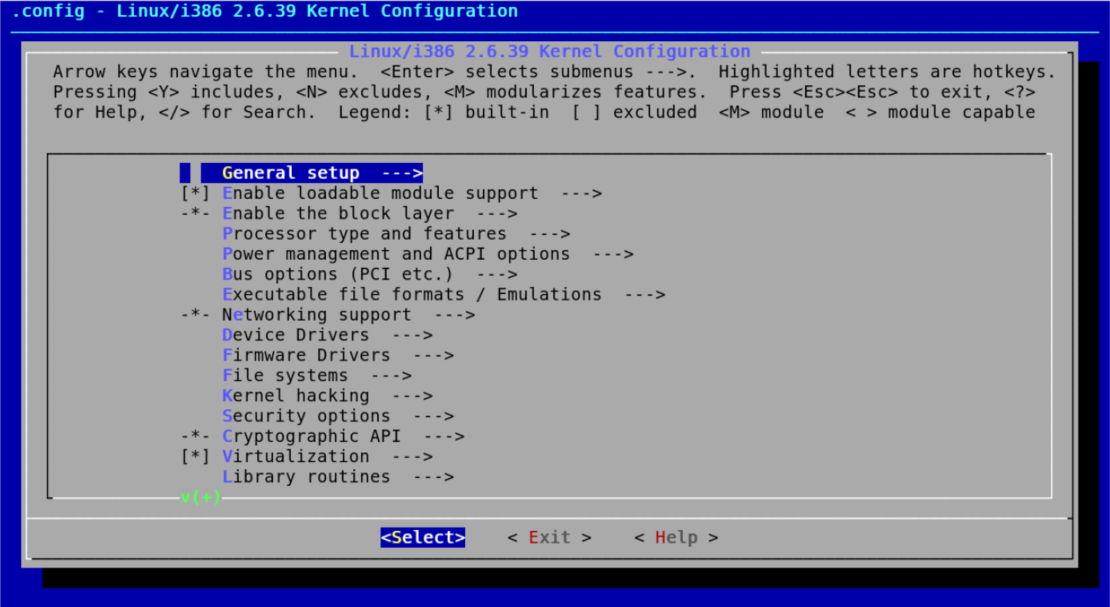
-
编译安装 依次使用
make->make modules->make modules_install->make install,命令编译安装内核,等待完成即可,大概十多分钟吧(不同的设备可能有所区别)。 -
修启动配置 安装好重启之前需要修改一下启动配置,使系统使用新的内核启动,编辑
/boot/grub/grub.conf,修改default的值,下面文件中列出了两个内核,要使用新安装啊2.6.39内核则需要把default的值改为0(从0开始计数,default=n即使用第n个内核),如下:# grub.conf generated by anaconda # # Note that you do not have to rerun grub after making changes to this file # NOTICE: You have a /boot partition. This means that # all kernel and initrd paths are relative to /boot/, eg. # root (hd0,0) # kernel /vmlinuz-version ro root=/dev/sda2 # initrd /initrd-version.img #boot=/dev/sda default=0 timeout=5 splashimage=(hd0,0)/grub/splash.xpm.gz hiddenmenu title Red Hat Enterprise Linux Server (2.6.39) root (hd0,0) kernel /vmlinuz-2.6.39 ro root=LABEL=/ rhgb quiet initrd /initrd-2.6.39.img title Red Hat Enterprise Linux Server (2.6.18-53.el5PAE) root (hd0,0) kernel /vmlinuz-2.6.18-53.el5PAE ro root=/dev/sda2 rhgb quiet -
重启系统 修改好配置后就可以重启系统,来更换新的内核了。重启前最好准备一个启动盘,以备启动失败时可使用live系统修复;使用Vbox/Vmware虚拟机的话可以使用快照功能,重启前打个快照,启动失败直接回溯。成功启动进入系统后
uname -r就可以看到系统版本已更新。
遇到的问题
编译安装,或者启动的时候难免会遇到一些问题,遇到问题不能直接放弃,起码要尝试解决一下,网上搜索一下或许就有可行的解决方案。当然有些可能容易找到解法办好,有些可能就难搞了。
编译时错误:gcc: error trying to exec ‘cc1’: execvp: No such file or directory
搜索系统内名为cc1的文件,可能是因为安装了多个版本编译器的原因发现有好多的,所有选择当前使用的编译器对应的cc1所在的路径添加到系统路径:
export PATH=/usr/local/gcc/bin:$PATH
其实,在这样操作之前从Stack Overflow看到一个方法是安装gcc-c++,试了一下没有效果。
编译时错误: previous declaration of ‘syscall_trace_leave’ was here
这个错误是这个版本的内核的bug,由于ptrace.h文件导致的内核编译出错的解决方法按下面的改动修改ptrace.h文件即可,
--- linux-2.6.32.59/arch/x86/include/asm/ptrace.h
+++ fix_ptrace.o_compile_error/arch/x86/include/asm/ptrace.h
@@ -130,6 +130,7 @@
 #ifdef __KERNEL__

 #include <linux/init.h>
+#include <linux/linkage.h>

 struct cpuinfo_x86;
 struct task_struct;
@@ -142,8 +143,8 @@
 			 int error_code, int si_code);
 void signal_fault(struct pt_regs *regs, void __user *frame, char *where);

-extern long syscall_trace_enter(struct pt_regs *);
-extern void syscall_trace_leave(struct pt_regs *);
+extern asmregparm long syscall_trace_enter(struct pt_regs *);
+extern asmregparm void syscall_trace_leave(struct pt_regs *);

 static inline unsigned long regs_return_value(struct pt_regs *regs)
启动错误:Kernel panic – not syncing: Attempted to kill init!
重启时遇到类似的错误:
mount: could not find filesystem ‘/dev/root’
setuproot: moving /dev failed: No such file or directory
setuproot: error mounting /proc: No such file or directory
setuproot: error mounting /sys: No such file or directory
switchroot: mount failed: No such file or directory
Kernel panic – not syncing: Attempted to kill init!
这个可以尝试在执行完make menuconfig后,修改/usr/src/linux-2.6.35.4/.config其中应该有#CONFIG_SYSFS_DEPRECATED_V2 is not set修改为CONFIG_SYSFS_DEPRECATED_V2=y;或直接在配置界面找到SYSFS_DEPRECATED相关配置项启用。然后重新编译安装。
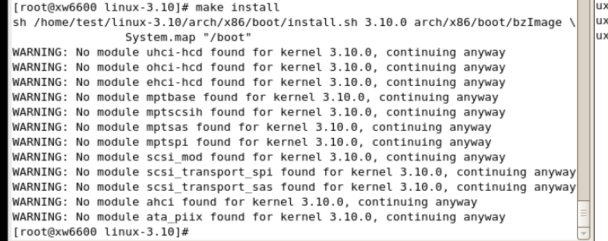
在尝试升级到3.10版本时也遇到了类似的错误(下面第一个图),不过这个方法就不奏效了。不知道是不是因为编译过程的警告没解决的原因(下面第二个图)。

kernel 3.10编译遇到错误: code model ‘kernel not support in the 32 bit mode
make menuconfig 进入内核配置,取消64位内核。
总结
由于2.6.39版本依然不能满足linuxdeploy的使用,而3.10版本有没有安装成功,所以此次内核升级的折腾总得来说是失败的。
参考